Ijraset Journal For Research in Applied Science and Engineering Technology
- Home / Ijraset
- On This Page
- Abstract
- Introduction
- Conclusion
- References
- Copyright
Biometric Steganography Using Mid Position Value Technique
Authors: Chakridhar N , Suravarapu Esther Keerthi
DOI Link: https://doi.org/10.22214/ijraset.2024.64848
Certificate: View Certificate
Abstract
Biometric data, is prone to attacks and threats from cyber criminals to conduct identity theft, and its economic value makes it a product that can be traded in underground marketplaces such as the dark web. Securing it is the need of the hour. Sensitive data is subsequently in danger throughout a biometric identification system, and therefore the security measures implemented to guard this data must cover all contingencies. A steganographic approach is proposed as a solution to this. Biometrics are hidden inside other biometrics for safe storage and secure transmission. Steganography is a process of hiding data in a transmission medium. The main objectives while hiding data are its undetectability, robustness against image processing and other attacks, which steganography can easily achieve. This project focuses on a process of hiding an image in another image by using mid position value(mpv) technique. Here we have to choose the secret biometric on which Arnold transform will be applied resulting in a scrambled version of the secret biometric. This will be embedded into the cover image resulting in a stego image. Lastly, the hidden secret biometric will be decoded from this stego image, which will first result in a scrambled secret biometric. Inverse Arnold Transform will be applied on this to finally result in the decoded secret biometric.
Introduction
I. INTRODUCTION
The majority of present-day authentication and verification systems are dependent on things like user’s memory power and traits, which requires users to remember multiple passwords or to possess tokens that, for example, generate one-time pin (OTP) numbers. However, these passwords and pins are often forgotten by the users or can become risky if they are written down. Sometimes, tokens can be lost, and the access to the required services is not possible until and unless the token is found or replaced. An individual’s behavioral, as well as physiological attributes, can identify a specific person uniquely, using their personal features so that there is no need to remember passwords or carry a note. The advantage with using biometrics is that these biometric characteristics do not need to be remembered. They do not get lost easily. While this biometric user-authentication and verification is convenient to use, it does make the safety of the digitised biometric data a critical matter. If this data is accessed by any hacker, it is often wont to conduct attacks by various means. Identification of persons by way of biometric features is an emerging phenomenon. Over the years, biometric recognition has received much attention due to its need for security. Amongst the many existing biometrics, fingerprints are considered to be one of the most practical ones. Techniques such as watermarking and steganography have been used in attempt to improve security of biometric data. Watermarking is the process of embedding information into a carrier file for the protection of ownership/copyright of music, video or image files, whilst steganography is the art of hiding information.
A. What is Biometrics Data?
Biometric data can be divided into two categories: physiological features, which include DNA, face, hand geometry, fingerprints, iris and retina, behavioural features, which include signature, gait and voice. There are various biometric techniques that can be used for verification or identification purposes.
1) Face
The facial recognition process works by analysing various components of a person’s face using a digital video camera.
2) Fingerprints
Every person’s fingerprints are unique, and will always maintain their uniqueness explaining why they have been used for many years for authentication purposes.
3) Retina
A retinal recognition scan, quite often confused with an iris scanner, is a biometric technique that uses the unique features of an individual’s retina to verify them. . A retinal biometric system functions by analysing the blood vessel region which is positioned behind the human eye see. Scanning includes the use of a low-intensity light source that determines the patterns of the retina to a high level of accuracy.
4) Iris
Iris biometrics operates by scanning and then analysing the characteristics that are present in the coloured tissue around the eye pupil. This area contains over two hundred particles, for example, rings, freckles and furrows, all of which can be used for data comparison. Every individual’s iris is different, even twins do not possess the same iris patterns.
5) Voice Recognition
A voice recognition system uses the vocal differences and speaking habits of individual’s to differentiate between them. It especially pays attention to pitch tone and frequency therefore the system will function more accurately when noise is kept to a minimum. Although, voice biometrics is a convenient and portable method of identification (i.e. it can be used to gain access to mobile devices such as smartphones), it also has its disadvantages.
6) Signature Recognition
A signature includes text that is repeated quite regularly in nature. For example, signing a child’s homework, signing our name on a cheque. During the signature biometric process a user signs their signature on paper (known as static mode recognition) or sometimes on a tablet type device that sits on top of a sensor (known as dynamic mode recognition).
7) Fingerprint As A Biometric Trait
During the mid-1800’s experimental studies discovered two critical features of fingerprints that are still valid today, (1) no two fingerprints are the same, (2) they will not change through the course of a person’s lifetime . Soon after these findings, organizations such as Scotland Yard were using fingerprints for criminal identification purposes. Digitization of fingerprints began in the early 1960’s, since then automated fingerprint recognition has been used in widely. The late 1990’s has seen the introduction of inexpensive hardware devices (fingerprint capturing devices), and fast and reliable matching algorithms. Among the many biometric techniques discussed above, the fingerprint biometric is one of the most popular ones, due to its high accuracy rate, ease of use and standardization. Furthermore, It is inexpensive, fast and easy to setup. In order for fingerprint scanning to work efficiently it generally requires the comparison of various fingerprint features. These features consist of patterns that are combined unique features of ridges, and minutia points, found within a fingerprint pattern .
As mentioned above there are different kinds of biometrics, such as Fingerprint, Face, Iris, Vein Geometry, Iris, Retina, Palm Print, DNA, etc. For the implementation of this project, Fingerprint images are taken.There are three techniques to secure the biometrics. Those are cryptography, Watermarking, Steganography. Of the above techniques, cryptography and watermarking have been accepted by industry as proven techniques, and these will continue to be the case for all biometric authentication systems. Additionally, the use of steganography to provide additional security for biometric data is also being accepted in the recent times.
8) Steanography
Steganography springs from the two Greek words Stego and Graphia, Stego means covering and graphia which means writing , thus the interpretation means writing or the hiding the information. Unlike cryptography, steganography messages do not draw attention to themselves, as data is hidden in such a way as to make it undetectable to the human eye.Compared to all the techniques which are used for performing the image steganography, mpv has the most similarity index with the cover image.Similarity index is a measure to compare the similar-ness of the stego-image with the cover image.
B. Objective
The key concept of this project is to get a secured communication between two authorities who want to pass their biometrics. This an application that can take a biometric image and cover it using other biometric image and finally be able to secure the biometrics using mid position value technique.
1) Existing System
Image Steganography is a process of hiding images or text in other images. This method is implemented in many areas. There are two main domains in Image Steganography, they are Spatial Domain Methods, which consist of techniques like least significant bit, pixel value differencing, Pixel mapping method, MSB bit difference method, Mid value position Technique (MPV). The other Method is Transform Domain method, which consists of techniques like discrete cosine transformation technique (DCT), Discrete Fourier transform (DFT), Discrete wavelet transform (DWT). These methods are implemented for Image in Image Steganography, and Text in image steganography, for general information.
However, securing biometric images is superior to hiding normal images, as it will aid in data security and privacy.Compared to all the techniques which are used for performing the image steganography, mpv has the most similarity index with the cover image.
Similarity index is a measure to compare the similar-ness of the stego-image with the cover image. The need to measure this is required to show that the stego-image does not give away any hints or clues with any distortion in the stego-image or disturbance in it, that there is an image hidden inside it. The stego-image should be very similar to the cover image, so that nobody will know that there is an image hidden inside it.
The below graph shows that, when compared to other techniques, the value of the mpv is very close to 1. It proves that the quality of the image is well maintained, i.e. the cover image and the stego-image are highly similar.
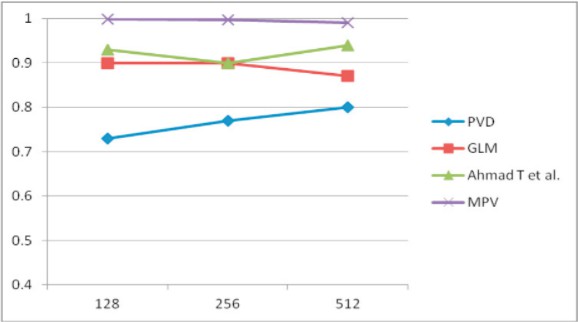
Fig 1.2.1 Comparison of similarity index
C. Methodology
Integration of Biometrics and Steganography is done by using various techniques like least significant bit (lsb) method, discrete cosine transformation (dct), etc.
The proposed algorithm is the technique called Mid Position Value(MPV) Technique. In this technique, a secret biometric image is hidden inside a chosen cover image, which is also a biometric image. This technique is basically a two-step process of Arnold transformation and embedding bits using mpv method. It is done by first scrambling the secret biometric image using Arnold transform and then embedding it inside the cover image, which results in a stego image. Finally the secret image is decoded from the stego image and Inverse Arnold Transform is applied to get the secret biometric image.
The cover image is also a chosen biometric image, because, the basic idea of steganography is hiding of the information. So, the secret image is safe inside the other biometric image. The secret image is also scrambled and then embedded, since it will act as a double shield from threats and attacks.
1) Dataset
Sokoto Coventry Fingerprint Dataset (SOCOFing) is a biometric fingerprint dataset designed for academic research purposes. It is made up of 6000 fingerprint images from 600 African subjects.This dataset is used as the cover images for the project. The secret images can be chosen from the same dataset, or the user can upload his own fingerprints. SOCOFing contains unique attributes such as labels for gender, hand and finger name as well as synthetically altered versions with three different levels of alteration for obliteration, central rotation, and z-cut. The dataset is freely available for noncommercial research purposes
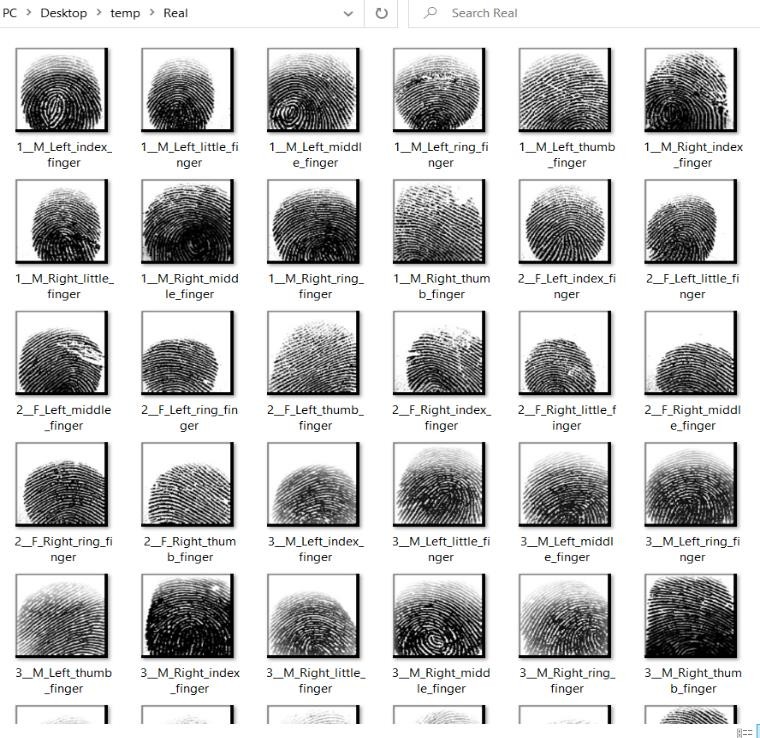
Fig 1.3.1 Dataset
III. REQUIREMENTS
A. Software Requirements
Software requirements is a field within software engineering that deals with establishing the needs of stakeholders that are to be solved by software. The IEEE Standard Glossary of Software Engineering Terminology defines a requirement as:
- A condition or capability needed by a user to solve a problem or achieve an objective.
- A condition or capability that must be met or possessed by a system or system component to satisfy a contract, standard, specification, or other formally imposed document.
- A documented representation of a condition or capability as in 1 or 2.
The activities related to working with software requirements can broadly be broken down into elicitation, analysis, specification, and management.
The software requirements specify the use of all required software products likedata management system. The required software product specifies the numbers and version. Each interface specifies the purpose of the interfacing software as related to this softwareproduct.
A software requirement can be of 3 types:
- Functional requirements: These are the requirements that the end user specifically Demands as basic facilities that the system should offer.
- Non-functional requirements: These are basically the quality constraints that the system must satisfy according to the project contract.
- Domain requirements: These are the requirements which are characteristic of a particular category or domain of projects
This project requirements are:
- Programming Language - Python Language.
- Editor – PyCharm.
- Packages – numpy, pillow, tkinter, matplotlib, imageio, opencv, easygui.
B. Hardware Requirements
The most common set of requirements defined by any operating system or software application is the physical computer resources, also known as hardware, A hardware requirements list is often accompanied by a hardware compatibility list (HCL), especially in case of operating systems. An HCL lists tested, compatible, and sometimes incompatible hardware devices for a particular operating system or application. The following sub-sections discuss the various aspects of hardware requirements.
The hardware requirement specifies each interface of the software elements and the hardware elements of the system. These hardware requirements include configuration characteristics.
Operating system - windows 7 Processor - Intel core i5 Memory - RAM 4GB Storage - 1TB
C. Technologies Description
1) Python
Python is an interpreted high-level programming language for general-purpose programming. Created by Guido van Rossum and first released in 1991, Python has a design philosophy that emphasizes code readability, notably using significant whitespace.
Python features a dynamic type system and automatic memory management. It supports multiple programming paradigms, including object-oriented, imperative, functional and procedural, and has a large and comprehensive standard library.
Python is Interpreted − Python is processed at runtime by the interpreter. You do not need to compileyour program before executing it. This is similar to PERL and PHP.Python is Interactive − you can actually sit at a Python prompt and interact with the interpreter directly to write your programs.
Python also acknowledges that speed of development is important. Readable and terse code is part of this, and so is access to powerful constructs that avoid tedious repetition of code.
Maintainability also ties into this may be an all but useless metric, but it does say something about how much code you have to scan, read and/or understand to troubleshoot problems or tweak behaviors. This speed of development, the ease with which a programmer of other languages can pick up basic Python skils and the huge standard library is key to another area where Python excels. All its tools have been quick to implement, saved a lot of time, and several of them have later been patched and updated by people with no Python background - without breaking.
2) Numpy
Numpy is a general-purpose array-processing package. It provides a high- performance multidimensional array object, and tools for working with these arrays.
It is the fundamental package for scientific computing with Python. It contains various features including these important ones:
- A powerful N-dimensional array object
- Sophisticated (broadcasting) functions
- Tools for integrating C/C++ and Fortran code
- Useful linear algebra, Fourier transform, and random number capabilities
Besides its obvious scientific uses, Numpy can also be used as an efficient multi- dimensional container of generic data. Arbitrary data-types can be defined using Numpy which allows Numpy to seamlessly and speedily integrate with a wide variety of databases
3) Tkinter
The tkinter package (“Tk interface”) is the standard Python interface to the Tk GUI toolkit. Tkinter is not the only GuiProgramming toolkit for Python. It is however the most commonly used one. CameronLaird calls the yearly decision to keep TkInter "one of the minor traditions of the Python world." Tkinter provides a powerful object-oriented interface to the Tk GUI toolkit.
Creating a GUI application using Tkinter is an easy task. All you need to do is perform the following steps −
- Import the Tkinter module.
- Create the GUI application main window.
- Add one or more of the above-mentioned widgets to the GUI application.
- Enter the main event loop to take action against each event triggered by the user.
4) Pillow
Pillow is the friendly PIL fork by Alex Clark and Contributors. PIL is the Python Imaging Library by Fredrik Lundh and Contributors. This library provides extensive file format support, an efficient internal representation, and fairly powerful image processing capabilities.
The core image library is designed for fast access to data stored in a few basic pixel formats.It should provide a solid foundation for a general image processing tool. The Python Imaging Library is ideal for image archival and batch processing applications. The Pillow library contains all the basic image processing functionality. You can do image resizing, rotation and transformation.
You can display images using Tk PhotoImage, BitmapImage and Windows DIB interface, which can be used with PythonWin and other Windows-based toolkits and many other Graphical User Interface (GUI) toolkits.For debugging purposes, there is a show () method to save the image to diskwhich calls the external display utility.
5) OpenCV
OpenCV-Python is a Python wrapper for the original OpenCV C++ implementation.OpenCV-Python makes use of Numpy, which is a highly optimized library for numerical operations with a MATLAB-style syntax. All the OpenCV array structures are converted to and from Numpy arrays. This also makes it easier to integrate with other libraries that use Numpy such as SciPy and Matplotlib.
6) Matplotlib
Matplotlib is a Python 2D plotting library which produces publication quality figuresin a variety of hardcopy formats and interactive environments across platforms.Matplotlib can be used in Python scripts, the Python and IPython shells,the Jupyter Notebook, web application servers, and four graphical user interface toolkits. Matplotlib tries to make easy things easy and hard things possible. You can generate plots, histograms, power spectra, bar charts, error charts, scatter plots, etc.. with just a few lines of code. For examples, see the sample plots and thumbnail gallery.
For simple plotting the pyplot module provides a MATLAB-like interface, particularly when combined with IPython. For the power user, you have full control of line styles, font properties, axes properties, etc, via an object oriented interface or via a set of functions familiar to MATLAB users.
7) Imageio
Imageio is a Python library that provides an easy interface to read and write a wide range of image data, including animated images, volumetric data, and scientific formats. It is cross-platform, runs on Python 3.5+, and is easy to install.
D. Arnold Transformation
Digital image scrambling can make an image into a completely different meaningless image during transformation, and it is a preprocessing during hiding information of the digital image, which also known as information disguise. Image scrambling technology depends on data hiding technology which provides non-password security algorithm for information hiding.
Data hiding technology led to a revolution in the warfare of network information, because it brought a series of new combat algorithms, and a lot of countries pay a lot of attentions on this area. Network information warfare is an important part of information warfare, and its core idea is to use public network for confidential data transmission. The image after scrambling encryption algorithms is chaotic, so attacker cannot decipher it. Some improved digital watermarking technology can apply scrambling method to change the distribution of the error bit in the image to improve the robustness of digital watermarking technology. Arnold scrambling algorithm has the feature of simplicity and periodicity, so it is used widely in the digital watermarking technology (Arnold transform is proposed by V. I. Arnold in the research of ergodic theory, it is also called catmapping, and then it is applied to digital image).
According to the periodicity of Arnold scrambling, the original image can be restored after several cycles. Because the periodicity of Arnold scrambling depends on the image size, it has to wait for a long time to restore an image. Generally, the cycle of Arnold transformation is not directly proportional to the image degree. Currently, Arnold scrambling algorithm is base on square digital image in most literature, and these images are mostly N×N pixels of the digital image. However, most of the digital images are non-square in the real world, so that we cannot use Arnold scrambling algorithm widely. To improve the Arnold scrambling algorithm, we will improve the original Arnold scrambling algorithm, so that we can apply Arnold scrambling algorithm to M×N non-square pixel digital image, it means the length and width of the image is not equal.
According to Arnold scrambling, the original image can be recovered after a certain number of iterations based on the size of the image. But the number of iterations will be different for different size of the images and the number of cycles does not follow any order. Currently, Arnold scrambling is applied to pixels only but it can be extended to blocks Alliance.
International Conference on Artificial Intelligence and Machine Learning (AICAAM), April2019 330 of the image also.
If the scrambling is performed on both pixels and blocks the robustness and security of the image can be improved. Arnold scrambling for pixels can be applied to any image of any size. But to apply Arnold scrambling to an image which is divided into blocks, the image size should be of order M×M. If the size of the image is not M×M, it can be made M×M by adding zeros to the image which is called as padding. Arnold transform is widely used in image stenography, authentication, tamper detection, self-recovery and image cryptography algorithms. In all these cases, Arnold transform is used as a scrambling step in which the number of iterations is used as a key. Arnold transform for pixel scrambling is used in most of the applications and hence provides one key for the security. The coordinates of the pixels are scrambled first which is followed by the coordinates of the blocks and thus providing two levels of security for scrambling. If the first level descrambling is successful, then only the second level descrambling can be carried out. This increases the complexity of malicious and unauthorized descrambling of images. This scrambling proposes a two level image scrambling to increase the robustness of Arnold transform. First, the plain image is divided into blocks and each block is assigned a coordinate. The block coordinates can be transformed through Arnold scrambling. Hence, each block of the image will get a new coordinate and gets scrambled. Once the blocks are scrambled and arranged as an image, pixel scrambling can be carried out to scramble all the pixels in the image. This two level can also be implemented by doing pixel scrambling first which is followed by block scrambling.
1) Two Level Arnold
First, the plain image is divided into blocks and each block is assigned a coordinate. The block coordinates can be transformed through Arnold scrambling. Hence, each block of the image will get a new coordinate and gets scrambled. Once the blocks are scrambled and arranged as an image, pixel scrambling can be carried out to scramble all the pixels in the image. This two level algorithm can also be implemented by doing pixel scrambling first which is followed by block scrambling.
a) Block Scrambling
In block scrambling, image is divided into M×M blocks and each block is assigned a coordinate {m,n} according to their spatial orientation. For an image of size 512×512, image can be divided into 64×64 blocks. Hence, there are spatial coordinates in the set of {(1,1), (1,2),…,(1,8),…,(8,1),(8,2),…,(8,8)}. Arnold scrambling is applied to the coordinates of blocks and hence each coordinate is assigned a new coordinate as given by equation (2). This paper proposes a block scrambling method for the blocks with same spatial resolution. This is possible only when the input image I(x,y) is of spatial resolution 2n ×2n ; where n=1,2,3,…,N. Scrambling of blocks through Arnold transform is given as follows.
[ {????(????????)} {????(????????)} ] = [ 1 1 1 2 ][ {????(????????−1)} {????(????????−1)} ] (mod M) (5) Where B(xi ,yi) is the coordinate of the block of an image. M is number of rows or number of columns of all the blocks.
b) Illustration Of Arnold Block Scrambling
First, the image is divided into blocks. For example, a 512 x 512 image is converted into blocks of size 128 x 128. Then the image will be divided into 16 blocks as shown in Fig. When Arnold scrambling is applied to blocks then the positions of blocks will get shifted.
|
B-1 |
B-2 |
B-3 |
B-4 |
|
||
|
B-5 |
B-6 |
B-7 |
B-8 |
|
||
|
B-9 |
B-10 |
B-11 |
B-12 |
|
||
|
B-13 |
B-14 |
B-15 |
B-16 |
|
||
|
B-1 |
B-15 |
B-9 |
B-7 |
|||
|
B-8 |
B-2 |
B-16 |
B-10 |
|||
|
B-11 |
B-5 |
B-3 |
B-13 |
|||
|
B-14 |
B-12 |
B-6 |
B-4 |
|||
Fig 2.4.1 Illustration of Arnold block scrambling
Let us consider block6 whose original position is at (2, 2) but after scrambling the position of block6 is shifted to new position i.e., (4, 3) for one iteration. For further iterations the input will be the output of previous iteration.
c) Scrambling Process

Fig 2.4.2 Scrambling process
In the scrambling process, the original image is scrambled in two levels as shown in Fig. 2. In the first level the image is subjected to pixel Arnold scrambling with a specific number of iterations. The information related to number of iterations of level1 will be in key1 (K1). The scrambled image is divided into 8 x 8 blocks. In the second level the divided image is subjected to block Arnold scrambling with other specified number of iterations. The information of number of iterations of second level scrambling will be in key2 (K2). The image obtained after the second level scrambling is the image that will be transmitted.
d) Descrambling Process
 Fig 2.4.3 Descrambling Process
Same as scrambling, the original image will be extracted in two levels as shown in Fig 3. The scrambled image is divided into blocks and inverse block Arnold scrambling is applied based on key2. In the second level, the obtained image after the inverse block Arnold scrambling will be subjected to pixel level inverse Arnold scrambling based on key1. The obtained image after the second level is the originalimage.
Image scrambling technology depends on data hiding technology which provides non- password security algorithm for information hiding.
Data hiding technology led to a revolution in the warfare of network information, because it brought a series of new combat
algorithms, and a lot of countries pay a lot of attentions on this area.
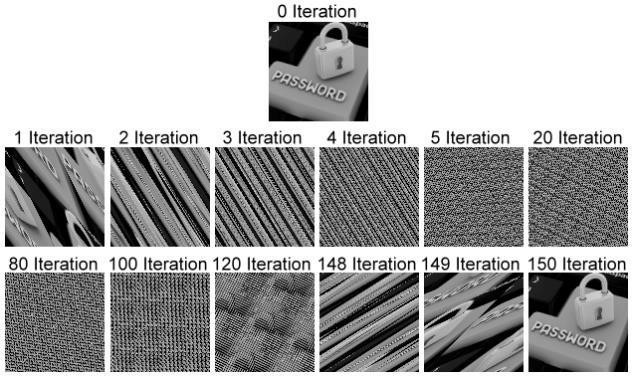
Fig 2.4.4 Sample Arnold Transformation
III. DESIGN
A. Introduction
Software design sits at the technical kernel of the software engineering process and is applied regardless of the development paradigm and area of application. Design is the first step in the development phase for any engineered product or system. The designer’s goal is to produce a model or representation of an entity that will later be built. Beginning, once system requirement have been specified and analyzed, system design is the first of the three technical activities -design, code and test that is required to build and verify software.
The importance can be stated with a single word “Quality”. Design is the place where quality is fostered in software development. Design provides us with representations of software that can assess for quality. Design is the only way that we can accurately translate a customer’s view into a finished software product or system. Software design serves as a foundation for all the software engineering steps that follow. Without a strong design we risk building an unstable system – one that will be difficult to test, one whose quality cannot be assessed until the last stage.
During design, progressive refinement of data structure, program structure, and procedural details are developed reviewed and documented. System design can be viewed from either technical or project management perspective. From the technical point of view, design is comprised of four activities – architectural design, data structure design, interface design and procedural design.
B. Architecture Diagram
Web applications are by nature distributed applications, meaning that they are programs that run on more than one computer and communicate through network or server. Specifically, web applications are accessed with a web browser and are popular because of the ease of using the browser as a user client. For the enterprise, software on potentially thousands of client computers is a key reason for their popularity. Web applications are used for web mail, online retail sales, discussion boards, weblogs, online banking, and more. One web application can be accessed and used by millions of people.
Like desktop applications, web applications are made up of many parts and often contain mini programs and some of which have user interfaces. In addition, web applications frequently require an additional markup or scripting language, such as HTML, CSS, or JavaScript programming language. Also, many applications use only the Python programming language, which is ideal because of its versatility.
1) Encoding Architecture

Fig 3.2.1 encoding architecture
2) Decoding Architecture
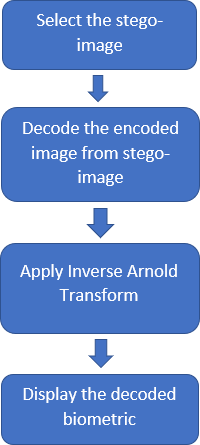
Fig 3.2.2 Decoding architecture
C. UML Diagrams
1) Use Case Diagram
To model a system, the most important aspect is to capture the dynamic behavior. Dynamic behavior means the behavior of the system when it is running/operating.
Only static behaviour is not sufficient to model a system rather dynamic behaviour is more important than static behaviour. In UML, there are five diagrams available to model the dynamic nature and use case diagram is one of them. Now as we have to discuss that the use case diagram is dynamic in nature, there should be some internal or external factors for making the interaction.
These internal and external agents are known as actors. Use case diagrams consist of actors, use cases and their relationships. The diagram is used to model the system/subsystem of an application. A single use case diagram captures a particular functionality of a system.
Hence to model the entire system, a number of use case diagrams are used.
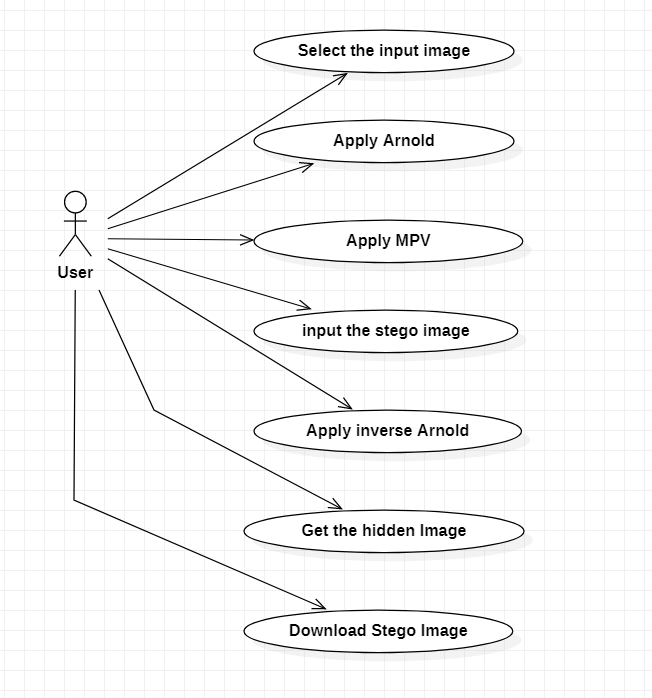
Fig 3.3.1 Usecase Diagram
2) Sequence Diagram
Sequence Diagrams Represent the objects participating the interaction horizontally and time vertically. A Use Case is a kind of behavioural classifier that represents a declaration of an offered behaviour. Each use case specifies some behaviour, possibly including variants that the subject can perform in collaboration with one or more actors.
Use cases define the offered behaviour of the subject without reference to its internal structure. These behaviours, involving interactions between the actor and the subject, may result in changes to the state of the subject and communications with its environment. A use case can include possible variations of its basic behaviour, including exceptional behaviour and error handling.
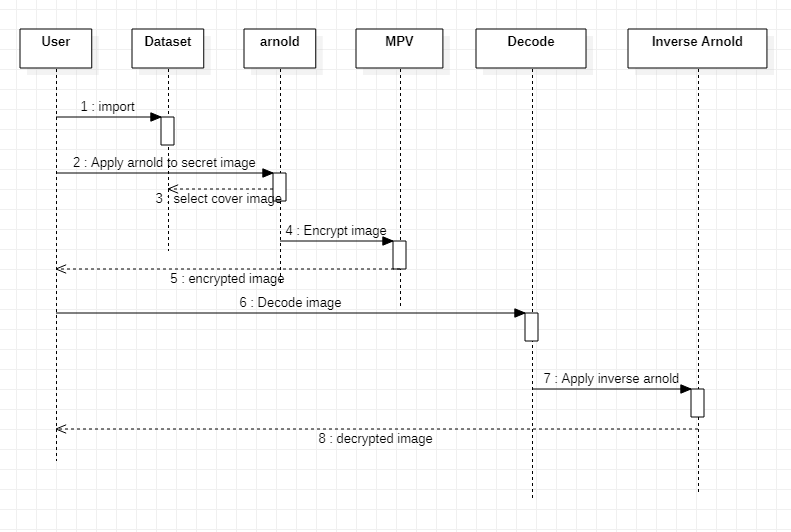
Fig 3.3.2 Sequence Diagram
3) Activity Diagram
Activity diagrams are graphical representations of Workflows of stepwise activities and actions with support for choice, iteration and concurrency. In the Unified Modeling Language, activity diagrams can be used to describe the business and operational step-by-
step workflows of components in a system. An activity diagram shows the overall flow of control.
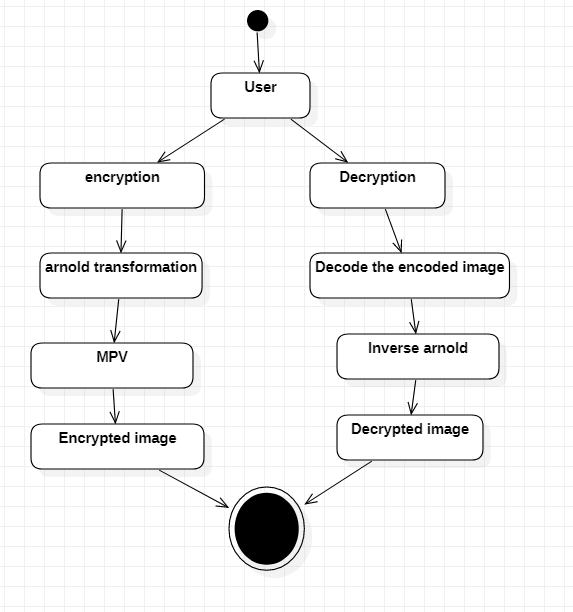
Fig 3.3.3 Activity Diagram
4) Collaboration Diagram
A collaboration diagram resembles a flowchart that portrays the roles, functionality and behaviour of individual objects as well as the overall operation of the system in real time. Objects are shown as rectangles with naming labels inside. These labels are preceded by colons and may be underlined.
The relationships between the objects are shown as lines connecting the rectangles. The messages between objects are shown as
arrows connecting the relevant rectangles along with labels that define the message sequencing.
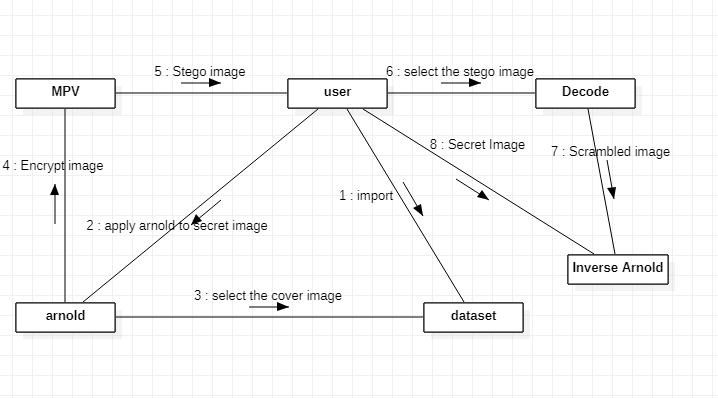
Fig 3.3.4 Collaboration Diagram
5) Class Diagram
The class diagram is the main building block of object-oriented modelling. It is used for general conceptual modelling of the systematic of the application, and for detailed modelling translating the models into programming code. Class diagrams can also be used for data modelling. The classes in a class diagram represent both the main elements, interactions in the application, and the
classes to be programmed.
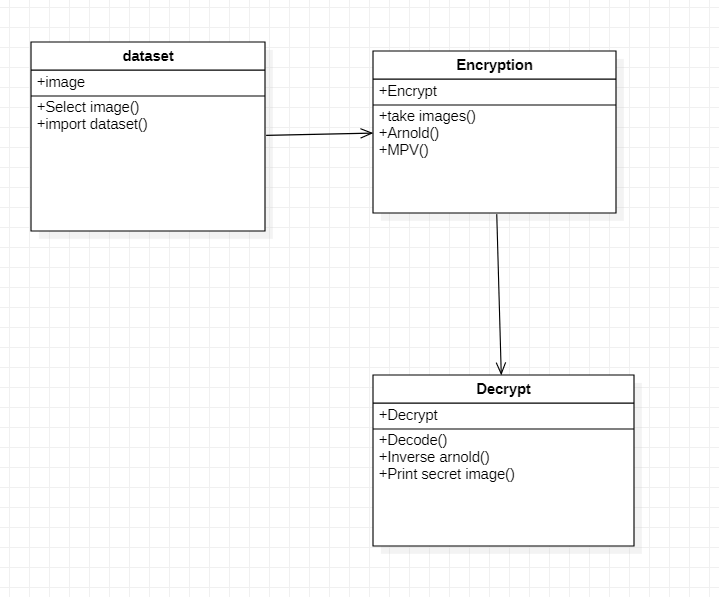
Fig 3.3.5 Class Diagram
IV. IMPLEMENTATION
A. Source Code
1) Main.py
from tkinter import *
from PIL import ImageTk,Image import scramble as sc
import mpv_main
import inverse_arnold as ia from tkinter import filedialog import easygui
import sys import imageio import os import random import cv2 root=Tk()
root.title('Biometric Steganography') root.geometry("600x400") root.config(background="light blue")
def arnold_transform(): sc.main(sys.argv[1:]) ar=Toplevel()
ar.title("Arnold Transformation") ar.geometry("600x400") ar.config(background="light blue") label1 = Label(ar,
text="Scrambled Image", fg = "light green",
bg = "dark blue",
font = "Helvetica 16 bold italic").pack()
im = Image.open("scrambled_for_secret.png") im = im.resize((250, 250), Image.ANTIALIAS) im = ImageTk.PhotoImage(im)
panel = Label(ar, image=im) panel.image = im panel.pack()
b3=Button(ar,text="Proceed to MPV",height = 2, width = 16,command=mpv).pack(pady = 30)
def mpv():
mpv_main.mpv_encode() mpv=Toplevel() mpv.title("MPV") mpv.geometry("600x400")
mpv.config(background="light blue") label1 = Label(mpv,
text="MPV Image", fg = "light green", bg = "dark blue",
font = "Helvetica 16 bold italic").pack() im = Image.open("encoded.png")
im = im.resize((250, 250), Image.ANTIALIAS) im = ImageTk.PhotoImage(im)
panel = Label(mpv, image=im) panel.image = im
panel.pack()
b3=Button(mpv,text="close", height = 2, width = 16,command=mpv.destroy).pack(pady = 30)
def open(): en=Toplevel() en.title("Encoding")
en.geometry("600x400") en.config(background="light blue") image_path = openfn()
image2 = cv2.imread(image_path) cv2.imwrite("choose.png", image2) label1 = Label(en,
text="Image to be Encoded ", fg = "light green",
bg = "dark blue",
font = "Helvetica 16 bold italic").pack() im = Image.open("choose.png")
im = im.resize((250, 250), Image.ANTIALIAS) im = ImageTk.PhotoImage(im)
panel = Label(en, image=im) panel.image = im panel.pack()
b2 = Button(en,text="Proceed to arnold",height = 2, width = 16,command=arnold_transform).pack(pady = 30)
def openfn():
filename = filedialog.askopenfilename(title='open') return filename
def inverse_mpv(): mpv_main.mpv_decode() temp3=Toplevel() temp3.title("hidden image") temp3.geometry("600x400")
temp3.config(background="light blue") label1 = Label(temp3,
text="Scrambled Image ", fg="light green", bg="dark blue",
font="Helvetica 16 bold italic").pack()
img = Image.open("hidden.png")
img = img.resize((250, 250), Image.ANTIALIAS) img = ImageTk.PhotoImage(img)
panel = Label(temp3, image=img) panel.image = img
panel.pack()
b9=Button(temp3,text="proceed to inverse arnold",height = 2, width = 20,command=inverse_arnold).pack(pady = 30)
def inverse_arnold():
ia.main(sys.argv[1:]) temp4=Toplevel() temp4.title("reconstructed image") temp4.geometry("600x400") temp4.config(background="light blue") label1 = Label(temp4,
text="Hidden Image ", fg="light green", bg="dark blue",
font="Helvetica 16 bold italic").pack() img = Image.open("reconstructed.png")
img = img.resize((250, 250), Image.ANTIALIAS) img = ImageTk.PhotoImage(img)
panel = Label(temp4, image=img) panel.image = img
panel.pack()
b10=Button(temp4,text="Close",height = 2, width = 16,command=temp4.destroy).pack(pady
= 30)
def close(): de=Toplevel() de.title("Decoding") de.geometry("600x400")
de.config(background="light blue") image_path = openfn()
image2 = cv2.imread(image_path) cv2.imwrite("encoded.png", image2) label1 = Label(de,
text="Image to be decoded ", fg = "light green",
bg = "dark blue",
font = "Helvetica 16 bold italic").pack() im = Image.open("encoded.png")
im = im.resize((250, 250), Image.ANTIALIAS) im = ImageTk.PhotoImage(im)
panel = Label(de, image=im) panel.image = im panel.pack()
b8 = Button(de,text="Proceed to inverse MPV",height = 2, width = 18,command=inverse_mpv).pack(pady = 30)
b1=Button(root, text="Encode", height = 2, width = 12, font=("Helvetica", 12, "bold"), bg="purple2", fg="white", command=open).pack(side=TOP,pady=45) b4=Button(root, text="Decode", height = 2, width = 12, font=("Helvetica", 12, "bold"), bg="purple2", fg="white", command=close).pack(side=TOP,pady=105) #upload.pack(side=TOP,pady=50)
mainloop()
2) Scramble.py
#!/usr/bin/env python3 import numpy as np import cv2
import math, time, sys from PIL import Image from arnold import Arnold
from tkinter import filedialog import os
import random def main(argv):
'''
path="D:\\P\\Processing\LSB\\Testing_proj\\Test\Dataset\\Real\\" files=os.listdir(path)
image_path =random.choice(files)
image_path = "D:\\P\\Processing\LSB\\Testing_proj\\Test\Dataset\\Real\\" + image_path''' # Arnold Transform Parameters
a = 6
b = 40
rounds = 33
# Open the images
test = np.array(Image.open("choose.png").convert("L")) #test = np.array(Image.open(image_path).convert("L")) arnold = Arnold(a, b, rounds)
start_time = time.time()
scrambled = arnold.applyTransformTo(test) exec_time = time.time() - start_time
#print("Transform execution time: %.6f " % exec_time, "sec") im = Image.fromarray(scrambled).convert("L") im.save("scrambled_for_secret.png")
def openfn():
filename = filedialog.askopenfilename(title='Open image to encode') return filename
if name == " main ": main(sys.argv[1:])
3) Steganography.py
import numpy as np
from tkinter import filedialog import cv2
import random
from PIL import Image
from matplotlib import pyplot as plt import os
import random def openfn():
filename = filedialog.askopenfilename(title='open') return filename
def show_image(image1, image2): plt.figure('Picture') plt.subplot(121) plt.imshow(image1[:, :, ::-1]) plt.subplot(122) plt.imshow(image2[:, :, ::-1]) plt.show()
plt.axis('off')
def check_image_extension(image_name):
if image_name.split(".")[1] != "PNG" and image_name.split(".")[1] != "png": raise Exception('Image extension is incorrect, should be "PNG" or "png"!')
def encode_image():
image1_name = "scrambled_for_secret.png" check_image_extension(image1_name) path="C:\\Users\\nissa\\OneDrive\\Desktop\\Final_MPV\\Real\\" files=os.listdir(path)
image_path =random.choice(files)
image2_name = "C:\\Users\\nissa\\OneDrive\\Desktop\\Final_MPV\\Real\\" + image_path #image2_name = openfn()
check_image_extension(image2_name) image1 = cv2.imread(image2_name) image2 = cv2.imread(image1_name) cv2.imwrite("cover.png", image2)
if image2.shape[0] > image1.shape[0] and image2.shape[1] > image1.shape[1]:
raise Exception('Image 2 should be smaller or equal to image1!') for i in range(image2.shape[0]):
for j in range(image2.shape[1]): for k in range(3):
binary_image1 = format(image1[i][j][k], '08b') binary_image2 = format(image2[i][j][k], '08b')
new_pixel_binary = binary_image1[:4] + binary_image2[:4] # concatenation bits #new_pixel_binary = binary_image1[2:6] + binary_image2[2:6]
image1[i][j][k] = int(new_pixel_binary, 2) # modify the image1's pixels to int new_image_name = "encoded.png"
check_image_extension(new_image_name) cv2.imwrite(new_image_name, image1)
def decode_image(): image_name = "encoded.png"
check_image_extension(image_name) merge_image = cv2.imread(image_name) original_image_name = "datasetpic.png" check_image_extension(original_image_name) decrypted_image_name = "hidden.png" check_image_extension(decrypted_image_name) width = merge_image.shape[0]
height = merge_image.shape[1]
image1 = np.zeros((width, height, 3), np.uint8) image2 = np.zeros((width, height, 3), np.uint8) for i in range(width):
for j in range(height): for k in range(3):
binary_merge_image = format(merge_image[i][j][k], '08b')
binary_image1 = binary_merge_image[:4] + chr(random.randint(0, 1) + 48) * 4 binary_image2 = binary_merge_image[4:] + chr(random.randint(0, 1) + 48) * 4 image1[i][j][k] = int(binary_image1, 2)
image2[i][j][k] = int(binary_image2, 2) cv2.imwrite(original_image_name, image1)
cv2.imwrite(decrypted_image_name, image2) #show_image(image1, image2)
def convert_text_2_binary(text):
binary = [format(ord(value), '08b') for value in text] return binary
def modify_pixels(pixels, text):
binary_list = convert_text_2_binary(text) length_text = len(binary_list) image_data = iter(pixels)
for i in range(length_text):
pixels = [j for j in image_data. next ()[:3] + image_data. next ()[:3] + image_data. next ()[:3]]
for j in range(0, 8):
if binary_list[i][j] == '0' and pixels[j] % 2 != 0: pixels[j] -= 1
elif binary_list[i][j] == '1' and pixels[j] % 2 == 0:
# check if the pixel is not 0 to prevent exceed from the range if pixels[j] != 0:
pixels[j] -= 1 else:
pixels[j] += 1 if i == length_text - 1:
if pixels[-1] % 2 == 0: if pixels[-1] != 0:
pixels[-1] -= 1 else:
pixels[-1] += 1
else:
if pixels[-1] % 2 != 0:
pixels[-1] -= 1 pixels = tuple(pixels) yield pixels[0:3]
yield pixels[3:6] yield pixels[6:9]
def new_image_pixels(new_image, text): width = new_image.size[0]
(x, y) = (0, 0)
for pixel in modify_pixels(new_image.getdata(), text): new_image.putpixel((x, y), pixel)
if x == width - 1: x = 0
y += 1
else:
x += 1
4) Inverse_arnold.py
import numpy as np import math, time, sys from PIL import Image from arnold import Arnold def main(argv):
image_name = "hidden.png" image_path = image_name
a = 6
b = 40
rounds = 33
scrambled = np.array(Image.open(image_path).convert("L")) arnold = Arnold(a, b, rounds)
start_time = time.time()
reconstructed = arnold.applyInverseTransformTo(scrambled) exec_time = time.time() - start_time
#print("Inverse T. execution time: %.6f " % exec_time, "sec") im = Image.fromarray(reconstructed).convert("L") im.save("reconstructed.png")
if name == " main ": main(sys.argv[1:])
5) Mpv_main.py
import Steganography as stegano def mpv_encode():
stegano.encode_image() def mpv_decode():
stegano.decode_image()
6) Arnold.py
import numpy as np from PIL import Image class Arnold:
def init (self, a:int, b:int, rounds:int): self. a = a
self. b = b
self. rounds = rounds
def mapping(self, s:np.shape):
x, y = np.meshgrid(range(s[0]), range(s[0]), indexing="ij") xmap = (self. a*self. b*x + x + self. a*y) % s[0] ymap = (self. b*x + y) % s[0]
return xmap, ymap
def inverseMapping(self, s:np.shape):
x, y = np.meshgrid(range(s[0]), range(s[0]), indexing="ij") xmap = (x - self. a*y) % s[0]
ymap = (-self. b*x + self. a*self. b*y + y) % s[0] return xmap, ymap
def applyTransformTo(self, image:np.ndarray): xm, ym = self.mapping(image.shape)
img = image
for r in range(self. rounds): img=img[xm, ym]
return img
def applyInverseTransformTo(self, image:np.ndarray): xm, ym = self.inverseMapping(image.shape)
img = image
for r in range(self. rounds): img = img[xm, ym]
return img
B. Testing
Software testing is a critical element of software quality assurance and represents the ultimate review of specification, design and coding. The increasing visibility of software as a system element and attendant costs associated with a software failure are motivating factors for we planned, through testing. Testing is the process of executing a program with the intent of finding an error. The design of tests for software and other engineered products can be as challenging as the initial design of the product itself.
There of basically two types of testing approaches.
One is Black-Box testing – the specified function that a product has been designed to perform, tests can be conducted that demonstrate each function is fully operated.
The other is White-Box testing – knowing the internal workings of the product ,tests can be conducted to ensure that the internal operation of the product performs according to specifications and all internal components have been adequately exercised.
White box and Black box testing methods have been used to test this package. The entire loop constructs have been tested for their boundary and intermediate conditions. The test data was designed with a view to check for all the conditions and logical decisions. Error handling has been taken care of by the use of exception handlers.
1) Testing Strategies
Testing is a set of activities that can be planned in advanced and conducted systematically. A strategy for software testing must accommodation low-level tests that are necessary to verify that a small source code segment has been correctly implemented as well as high-level tests that validate major system functions against customer requirements.
Software testing is one element of verification and validation. Verification refers to the set of activities that ensure that software correctly implements as specific function. Validation refers to a different set of activities that ensure that the software that has been built is traceable to customer requirements.
The main objective of software is testing to uncover errors. To fulfill this objective, a series of test steps unit, integration, validation and system tests are planned and executed. Each test step is accomplished through a series of systematic test technique that assist in the design of test cases. With each testing step, the level of abstraction with which software is considered is broadened.
Testing is the only way to assure the quality of software and it is an umbrella activity rather than a separate phase. This is an activity to be performed in parallel with the software effort and one that consists of its own phases of analysis, design, implementation, execution and maintenance.
2) Unit Testing
This testing method considers a module as single unit and checks the unit at interfaces and communicates with other modules rather than getting into details at statement level. Here the module will be treated as a black box, which will take some input and generate output. Outputs for a given set of input combination are pre-calculated and are generated by the module.
3) System Testing
Here all the pre tested individual modules will be assembled to create the larger system and tests are carried out at system level to make sure that all modules are working in synchronous with each other. This testing methodology helps in making sure that all modules which are running perfectly when checked individually are also running in cohesion with other modules. For this testing we create test cases to check all modules once and then generated test combinations of test paths throughout the system to make sure that no path is making its way into chaos.
4) Integrated Testing
Testing is a major quality control measure employed during software development. Its basic function is to detect errors. Sub functions when combined may not produce than it is desired. Global data structures can represent the problems. Integrated testing is a systematic technique for constructing the program structure while conducting the tests. To uncover errors that are associated with interfacing the objective is to make unit test modules and built a program structure that has been detected by design. In a non - incremental integration all the modules are combined in advance and the program is tested as a whole. Here errors will appear in an endless loop function. In incremental testing the program is constructed and tested in small segments where the errors are isolated and corrected.
Different incremental integration strategies are top – down integration, bottom – up integration, regression testing.
5) Regression Testing
Each time a new module is added as a part of integration as the software changes. Regression testing is an actually that helps to ensure changes that do not introduce unintended behavior as additional errors.
Regression testing maybe conducted manually by executing a subset of all test cases or using automated capture play back tools enables the software engineer to capture the test case and results for subsequent playback and compression. The regression suit contains different classes of test cases.
A representative sample to tests that will exercise all software functions.
Additional tests that focus on software functions that are likely to be affected by the change.
C. Test Cases
Integrated and regression testing strategies are used in this application for testing.
 Fig 4.3.1 Test cases
D. Execution Screenshots
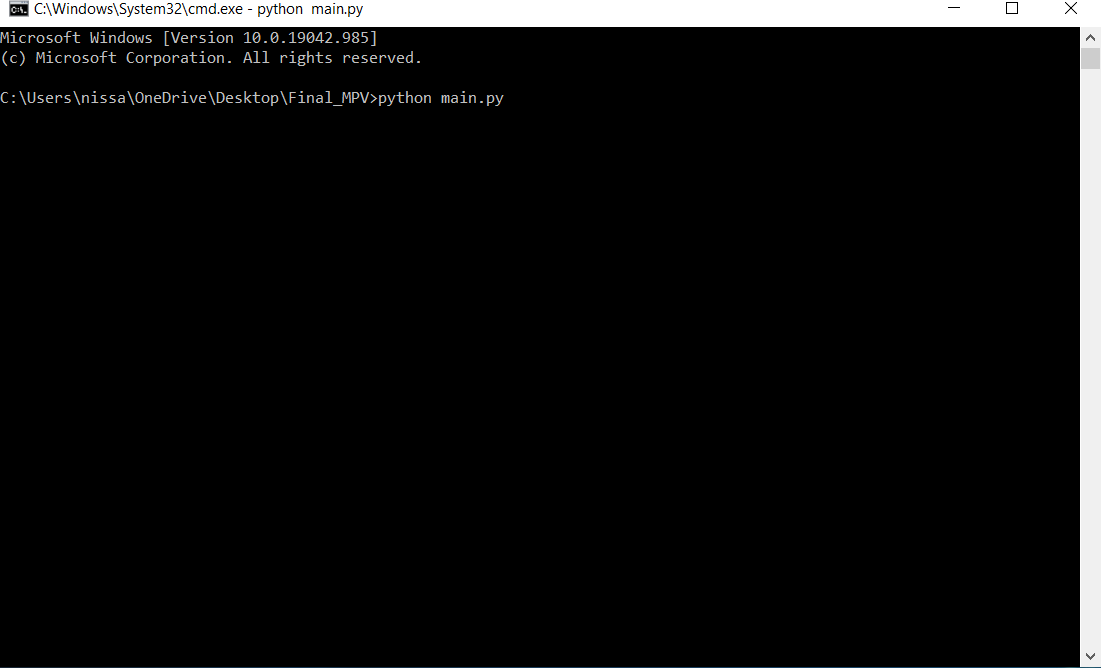 Fig 4.4.1 execution page
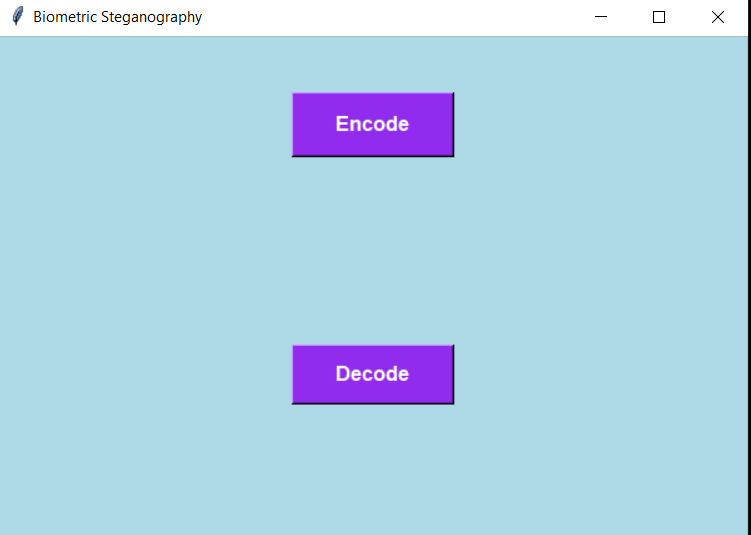
Fig 4.4.2 Student Dashboard
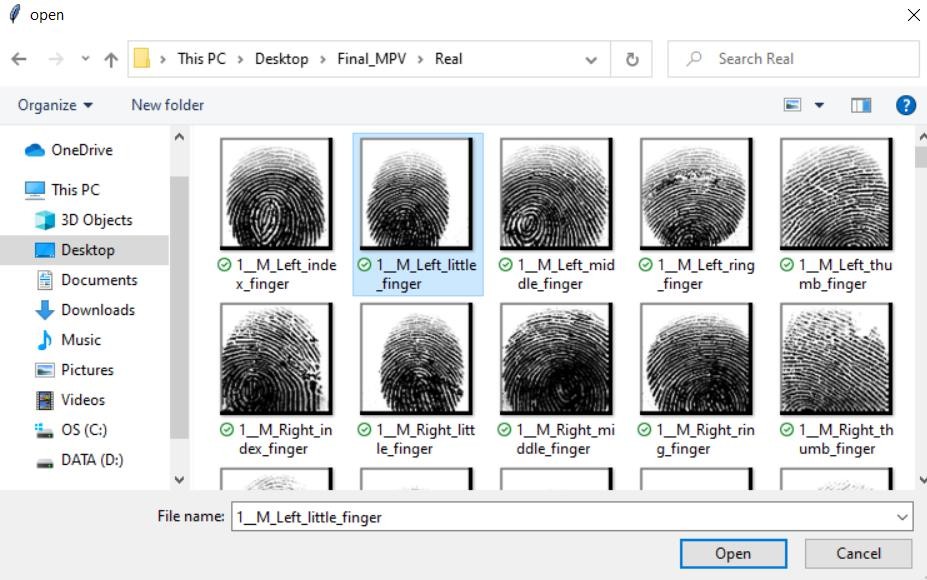
Fig 4.4.3 Selecting the secret image
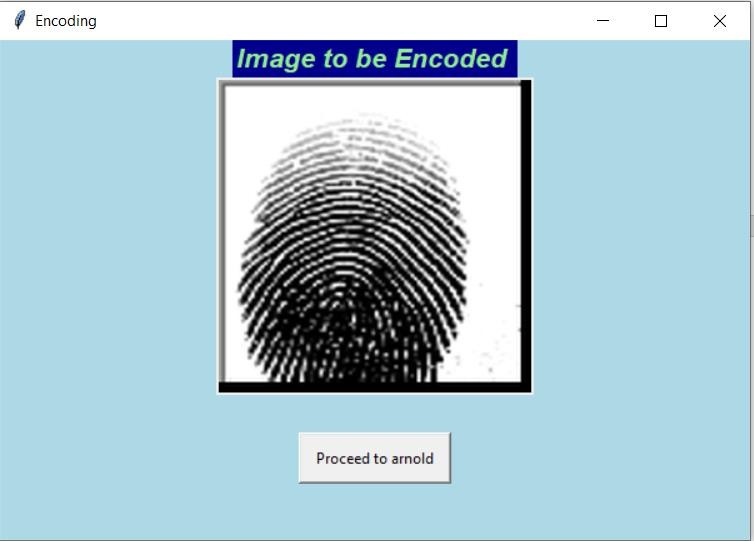
Fig 4.4.4 secret image
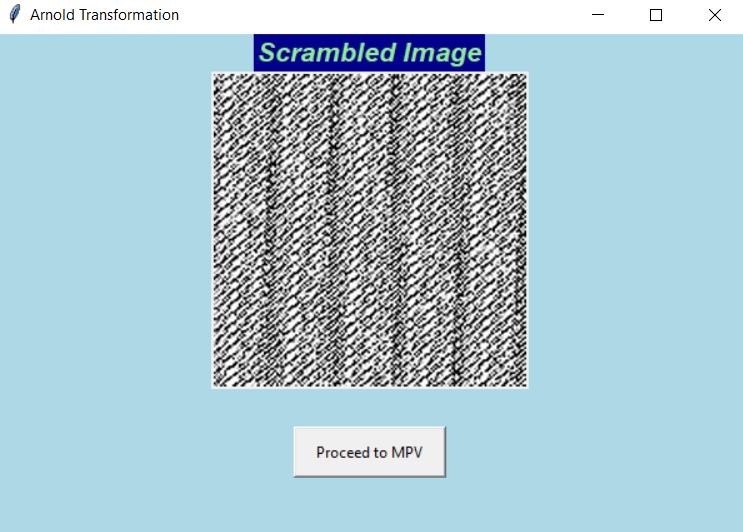
Fig 4.4.5 Scrambled image
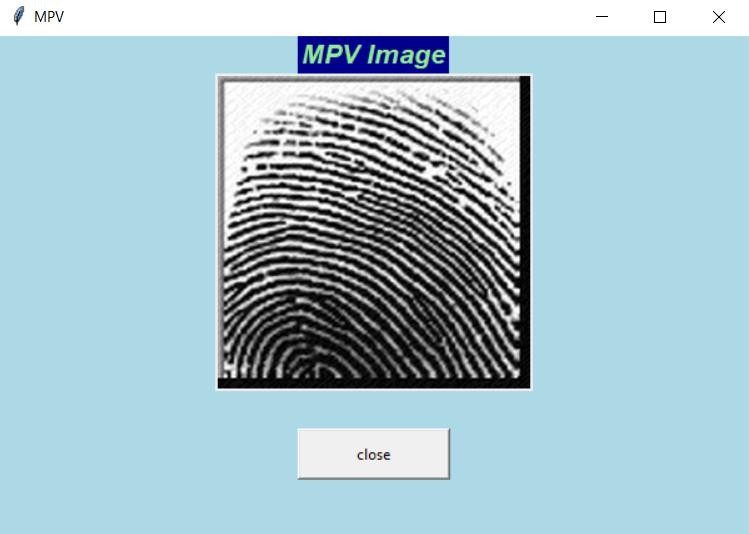
Fig 4.4.6 Encrypted image
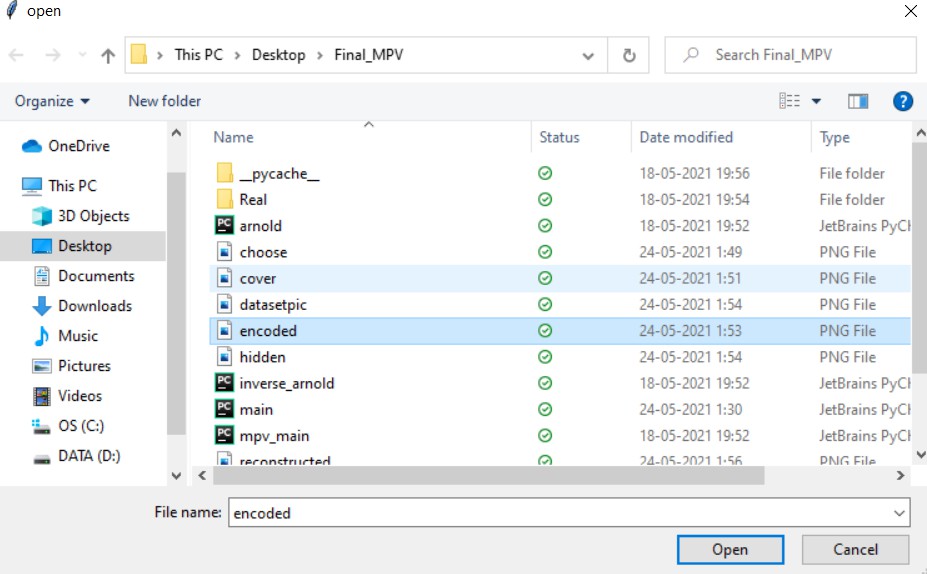
Fig 4.4.7 Selecting the stego image
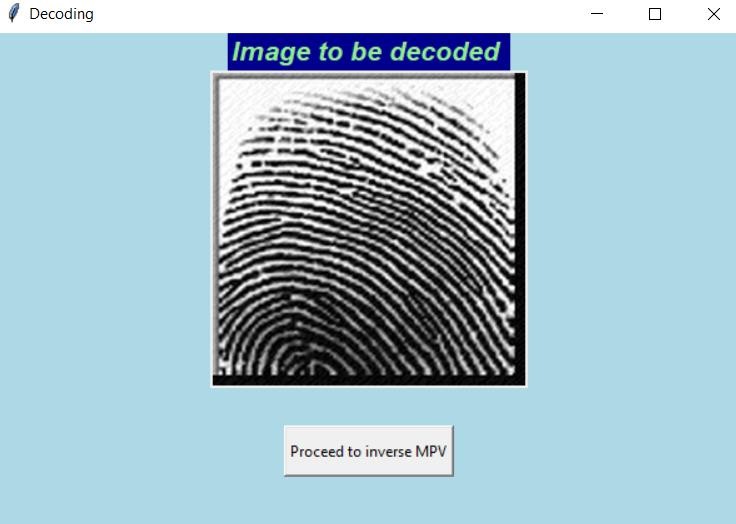
Fig 4.4.8 Stego Image
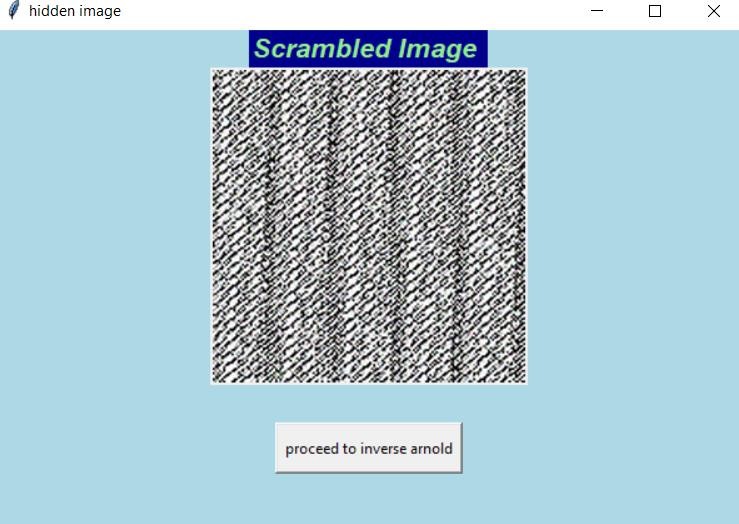
Fig 4.4.9 Applying Inverse Arnold
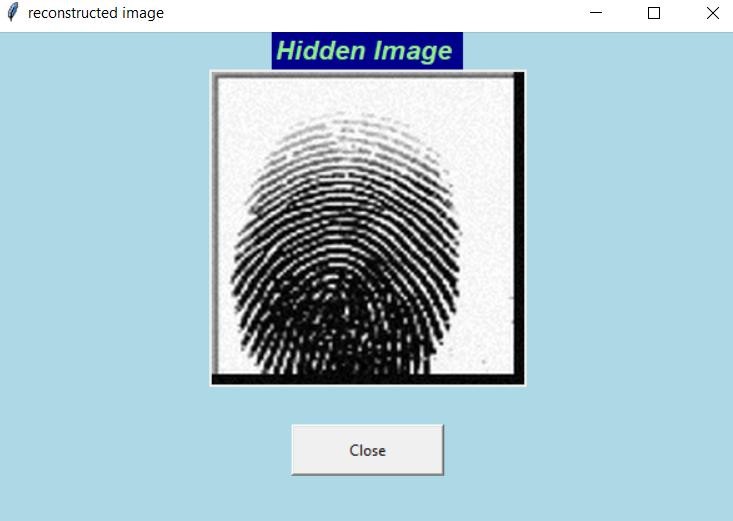
Fig 4.4.10 Decrypted Image
Conclusion
Steganography is a technique which aids in security for several purposes during communication. In this paper, a steganographic approach is proposed for biometrics in image medium which masks the secret data bits that have to be transmitted without any third-party intervention. Application of Arnold Transform on the input image renders a level of security in the beginning of the process itself. The MPV technique follows a conditional strategy while embedding of secret data bits. The application of reverse mpv and inverse arnold transform does the decoding of the stego-image at the receiver end. The advantage of this method is that, the receiver does not need any extra key for decoding the secret image. The stego image itself gives a layer of security since it is also a biometric image. Thus, the overall security is endorsed. Hence, it doesn\'t attract the eye of unwanted sources. This application provides a solution to those problems where there is security problem for biometrics. As we have seen a lot of issues regarding stealing or manipulating of biometrics this application makes the process easy and simple way for those who want to complete their communication securely. This also helps those who cannot remember their passwords etc., The future enhancement of this application is 1) To increase the range from fingerprint to other biometrics. 2) To implement with two level arnold.
References
[1] https://www.researchgate.net/publication/325657541_Image_Steganography_Using_ Mid_Position_Value_Technique [2] https://www.academia.edu/10228724/FINGERPRINT_BASED_IMAGE_STEGANO GRAPHY_IN_TRANSFORM_DOMAIN [3] http://www.ijstr.org/final-print/dec2019/-Image-Steganography-Using-Lsb.pdf [4] https://www.researchgate.net/publication/333559334_Integration_of_Biometrics_and_Steganography_A_Comprehensive_Review [5] https://ijarcce.com/wp-content/uploads/2018/10/IJARCCE.2018.7910.pdf [6] https://www.hindawi.com/journals/jcnc/2018/9475142/
Copyright
Copyright © 2024 Chakridhar N , Suravarapu Esther Keerthi. This is an open access article distributed under the Creative Commons Attribution License, which permits unrestricted use, distribution, and reproduction in any medium, provided the original work is properly cited.

Download Paper
Paper Id : IJRASET64848
Publish Date : 2024-10-27
ISSN : 2321-9653
Publisher Name : IJRASET
DOI Link : Click Here
 Submit Paper Online

