

Ijraset Journal For Research in Applied Science and Engineering Technology
Distance Meter Using Arduino
Authors: Prof. Deepa Patki, Sahil Butala, Sujal Gorave, Ashish Gosavi, Prathamesh Pakale
DOI Link: https://doi.org/10.22214/ijraset.2025.67141
Certificate: View Certificate
Abstract
The purpose of this project was to aware students of engineering about the working and application of the Arduino and sensors. These instrumentational tools play a vital role in construction of integrated and complex real-life systems. We used ultrasonic sensor along with a microprocessor (Arduino) to measure distance of the object in range of the particular sensor. We coded our microprocessor to work for the particular application. As a result, we were able to measure critical distance which as an application will be used a sparking warning device. Nowadays, we have some difficulties in obtaining the distance that we want to measure. Even though, measuring tape is an easy option, but this kind of amount of time taken for a pulse of sound travel to a particular surface and return as the reflected echo. After that, the circuit that have been programmed with AT mega microcontroller will calculate the distance based on the speed of sound at 25°Cwhichanambient temperature and also the time taken. The distance then will be display on a LCD module.
Introduction
I. INTRODUCTION
Ultrasonic Distance Measurement is a useful tool in various applications lately. It can be used invarious applications such as positioning, locating, dimensioning0 speed and various other physical dimensions. The device also has applications in the field of robotics. So keeping these applications in mind, the Ultrasonic Sensor is a great tools to measure distances without making any physical contact for small distances. They use the concept of ECHO to measure the distance. In this project, we’ll learn how to measure the distance by interfacing HC-SR04 sensor module with Arduino anddisplaythedistanceona16×2LCD.Inorderto tool will have a limitation of manual error. Before this, engineers have produced a range finder module but, in the end, they find out the module have many disadvantages like limitation for distance, different result for different coloured obstacles, and need a calibration for every time before starts using it. Manual distance measuring is always done at the expense of human error.
Precise and fix measurement to flow range distance, is the main objective for this project. This device can measure distance in the range of 0.5m to 4m with the accuracy of1cm.This project is used to measure the distance by using ultrasonic sensors. It works by transmitting ultrasonic waves at 40 kHz., Then, the transducers will measure .
Calculate the distance between the sensor and the object, the sensor measures the time. It takes between the emissions of the sound by the transmitter to its contact with the receiver. The formula for this calculation is D = ½ T xC (where D is the distance, T is the time, and C is the speed of sound ~343 meters/second).Anultra sonic sensor emits sound waves toward an object and determines its distanceby detecting reflected waves Ultrasonic sensor diagram. (Robo Galaxy) Ultra sonic sensors are used primarily as proximity sensors.
II. THEORYOFOPERATION
This application is based up on the reflection of sound waves. Sound waves are defined as longitudinal pressure ways in the medium in which they are travelling. Subjects whose dimensions are larger than the wave length of the impinging sound waves reflect them, the reflected waves are called Echo. If the speed sound in the medium is known and the time taken for the sound waves travels the distance from the source to the subject and back to the source is measured, the distance from the source to the subject can be computed accurately. This is the measurement principle of this application. Here the medium for the sound waves is air, and the sound waves used are ultrasonic, since it is inaudible to humans. Assuming thatthespeedofsoundinairis1100feet/second at the room temperature and that measured time taken for the sound to travel distance from the source to the subject and back to the source is second, the distance d is computed by the formulated=1100 X 12 Xt inches. Since the sound waves travel twice the distance between the source and the subject, the actual distance between the source and the subject will bed/2.Asingle I/Opinis used to triggers an ultra-sonic burst. This Is an efficient way to measure small distances precisely. In this project we have used the HC-SR04 Ultrasonic Sensor with Arduino to determine the distance of an obstacle from the sensor. The basic principle of ultrasonic distance measurement is based on ECHO. When sound waves are transmitted in the environment then waves return back to the origin as ECHO after striking on the obstacle. So we only need to calculate the traveling time of both sounds means outgoing time and returning time to origin after striking on the obstacle.
III. METHODOLOGY
The technique of distance measurement using ultrasonic in air include continuous wave & pulse echo technique. In the pulse echo method, a burst of pulses is sent through the transmission medium & is reflected by an object kept at special distance. The time taken for the pulse to propagate from transmitter to receiver is proportional to the distance of object. For contactless measurement of distance, the device has to rely on the target to reflect the pulse back to itself.
IV. LITERATURE SURVEY
Distance measurement is the activity of obtaining and comparing in our real world. It is one of the important functions in science, engineering and astronomy to business activities. There are many types of distance measurement systems we use in our environment from normal rulers to Interferometer. In applications, basic concept of electronic distance measure system is adopted in many areas like aviation, navigation and many more. In aviation, direct feedback system is required for linear positioning and motion control application. One of the good examples for distance measurement in navigation is GPS system using satellites.
So there is no doubt about the usefulness of distance measurement technology in our environment. Reviews of available literature of this project have been performed to ensure more understanding to construct ultrasonic distance meter. The areas that were focused are on behaviour of ultrasound through journals, books, and internet. Although many different type of ranging systems available in market, there are only three major type of ranging systems used in technology which are
V. PRODUCT ARCHITECTURE
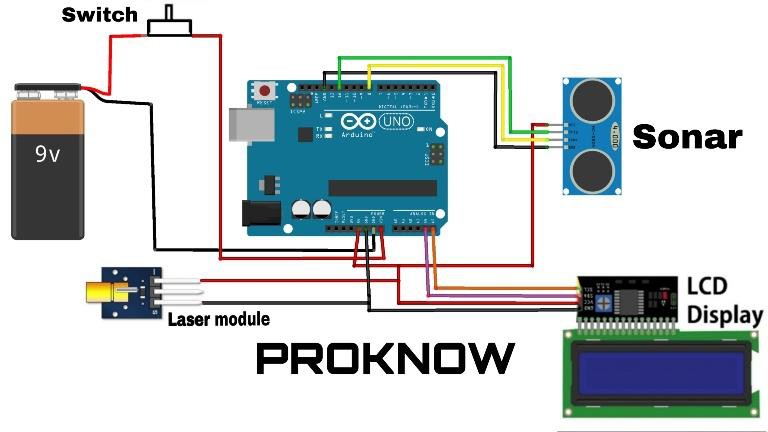
Fig1:ProductArchitecture
The Product Architecture for Arduino and ultrasonic sensor is shown above to measure the distance. In circuit connections Ultrasonic sensor module’s “trigger” and “echo” pins are directly connected to pin 18(A4)and19(A5)ofArduino.A16x2LCDis connectedwithArduinoin4-bitmode.ControlpinRS, RWandEnaredirectlyconnectedtoArduinopin2, GND and 3.And data pinD4-D7 is connected to 4, 5, 6 and 7 of Arduino. First of all, we need to trigger the ultrasonic sensor module to transmit signal by using Arduino and then wait for receive ECHO. Arduino reads the time between triggering and Received ECHO. We know that speed of sound is around 340m/s. so we can calculate distance by using given formula: Distance=(traveltime/2)*speed of sound Where speed of sound around 340m per second. A 16x2 LCD is used for displaying distance
The hardware components the systemas explain below:-
-
- Ultrasonic sensor Module
- LcdDisplay16X2
- Arduino
- Ultrasonic sensor Module:
The HC-SR04 Ultrasonic Distance Sensor is an in expensive device that is very useful for robotics and test equipment projects. This tiny sensor is capable of measuring the distance between itself andthenearestsolidobject.TheHC-SR04canbe hooked directly to an Arduino or other microcontroller and it operates on 5 volts. This ultrasonic distance sensor is capable of measuring distances between 2 cm to 400 cm. It’s an Ultrasonic sensors release short, high frequency sound pulses are emitted by Ultrasonic sensor’s transmitter at regular intervals. They travel in the air at the speed of sound. Once the sound pulse strikes an object, it is reflected back as echo signals and spent by the sound to be transmitted and bounced back to the receiver.
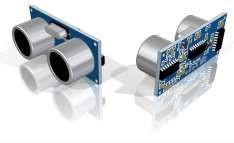
Fig2: Ultra sonic sensor module
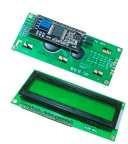
Fig3:LCDDisplay16X2
Lcd Display: LCD (Liquid Crystal Display) is a type of flat panel display which uses liquid crystals in its primary form of operation. LED shave a large and varying set of use cases for consumers and businesses, as they can be commonly found in smartphones, televisions, computer monitors and instrument panels. LCDs were a big leap in terms of the technology they replaced, which include light-emitting diode (LED) and gas-plasma displays. LCDs allowed displays to be much thinner than cathode ray tube (CRT) technology.
LCDs consume much less power than LED and gas display displays because they work on the principle of blocking light rather than emitting it. Where an LED emits light, the liquid crystals in an LCD produces an image using a backlight. As LCDs have replaced older display technologies, LCDs have begun being replaced by new display technologies such as OLED.
A. Arduino UNO
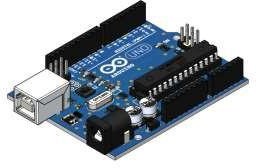
Fig4:ArduinoUNO
It is an open-source electronics platform. It consists ATmega3288-bit Microcontroller. It can be able to read inputs from different sensors & we can send instructions to the microcontroller in the Arduino. It provides Arduino IDE to write code & connect the hardware devices like Arduino boards & sensors. In 2019, Arduino released the Arduino Nano Every, a pin-equivalent evolution of the Nano. It features a ATmega4809 microcontroller (MCU) with three times the RAMThe Arduino Nano has a number of facilities for communicating with a computer, another Arduino, or other microcontrollers. The ATmega328 provides UART TTL serial (5V) communication, which is available on digital pins0 (RX) and 1 (TX). An FTDI FT232RLonthe board channels this serial communication over USB and the FTDI drivers (included with the Arduino firmware) provide a virtual com port to software on the computer. The Arduino software includes a serial monitor which allows simple textual data to be sent to and from the Arduino board. The RX and TXLEDs on the board flash when data is being transmitted via the FTDI chip and the USB connection to the computer (but not for serial communication on pins 0 and 1). A Software Serial library allows for serial communication on any of the Nano's digital pins. The ATmega328 also supports I2C and SPI communication .The Arduino software includes the Wire library to simplify use of the I2C bus.
VI.REAL IMAGES
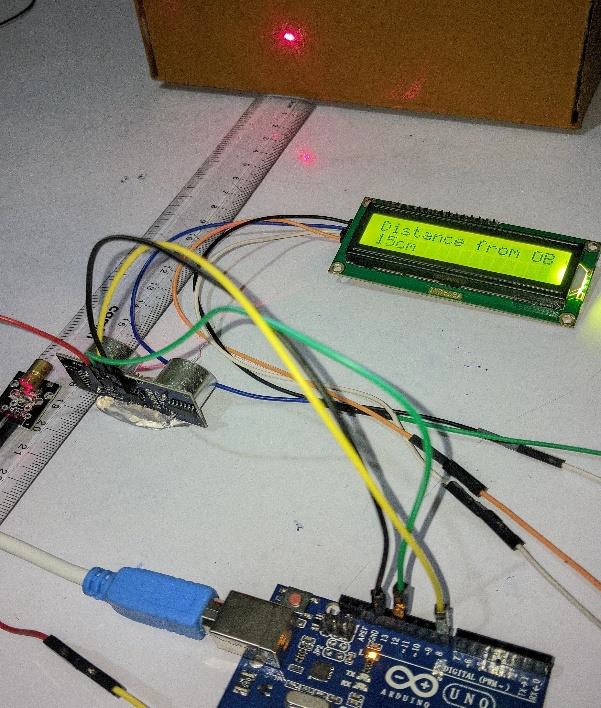
Fig5: Projectmodel
A. Conclusion
Summarize the overall success of the project. Discuss whether the objectives were met and if the system function as intended. Offer a closing statement on the significance of the project in the context of distance measurement using ultrasonic sensor and Arduino importance of the project is calculating accurate distance from any obstacle that we want to the measure. The device can be used in many different fields and categories like distance calculation in construction field, robots, car sensor to avoid obstacles and many other applications. The building process of the device was based on using as much as possible from the courses taken in the university, like Micro Processor, Basic Electrical Engineering, Multimedia and systems and Electronics Devices and also practical work in the.
VII. PROGRAM USED
Address Scanned Program For Arduino:
#include<Wire.h>
voidsetup()
{
Serial.println("NoI2C devices found\n");
else
Serial.println("done\n");
delay(5000); //wait
5secondsfornextscan
}
Wire.begin();
Serial.begin(9600); Serial.println("\nI2C
Scanner");
}
voidloop()
{
byteerror,address; int nDevices;
Serial.println("Scanning..."); nDevices = 0;
for(address=1;address<127;
address++)
{
//Thei2c_scannerusesthe return value of
//theWrite.endTransmisstion to see if
//adevicedidacknowledge to the address.
Wire.beginTransmission(address); error =
Wire.endTransmission();
if(error==0)
{
Serial.print("I2Cdevice found at address 0x");
if (address<16) Serial.print("0");
Serial.print(address,HEX); Serial.println("!");
nDevices++;
}
elseif(error==4)
{
Serial.print("Unknowerror at address 0x");
if (address<16) Serial.print("0");
Serial.println(address,HEX);
}
}
if(nDevices==0)
- Final Code For Circuit
//Distance sensor #definetrigPin12
#defineechoPin 8
//FlashingLEDonArduinoboard #define LEDPin 13
//LCD
#include<Wire.h> #include <LCD.h>
#include<LiquidCrystal_I2C.h>
#defineI2C_ADDR0x20 //Define I2CAddresswherethePCF8574Ais #define BACKLIGHT_PIN3
#defineEn_pin2
#defineRw_pin1
#defineRs_pin0
#defineD4_pin4
#defineD5_pin5
#defineD6_pin6
#defineD7_pin7
intn = 1;
LiquidCrystal_I2C lcd(I2C_ADDR,En_pin,Rw_pin,Rs_pin
,D4_pin,D5_pin,D6_pin,D7_pin);
voidsetup()
{
Serial.begin(9600); pinMode(trigPin,OUTPUT);
//Thetransmitpinofthe ultrasonic sensor
pinMode(echoPin,INPUT);
//Thereceivepinofthe ultrasonic sensor
pinMode(LEDPin,OUTPUT);
//TheLEDoftheArduino
lcd.begin(20,4);//Sizeof LCD
//Switchonthe backlight
}
else
{
lcd.clear(); lcd.setCursor(0,0); lcd.print("STEPAWAY!!!"); lcd.setCursor(0,1); lcd.print("STEPAWAY!!!"); lcd.setCursor(0,2); lcd.print("STEPAWAY!!!"); lcd.setCursor(0,3); lcd.print("STEPAWAY!!!"); digitalWrite(LEDPin,HIGH); delay(50); digitalWrite(LEDPin,LOW); delay(50); digitalWrite(LEDPin,HIGH); delay(50); digitalWrite(LEDPin,LOW); delay(50); digitalWrite(LEDPin,HIGH); delay(50); digitalWrite(LEDPin,LOW); delay(50); digitalWrite(LEDPin,HIGH); delay(50); digitalWrite(LEDPin,LOW); delay(50); digitalWrite(LEDPin,HIGH);
VIII. FUTURESCOPE
The development of a distance meter using Arduino can evolve significantly in the future with advancements in technology and integration with new systems. Below are several future directions and possibilities for expanding the scope of the distance measurement system
Conclusion
By using these components, you can create a functional and interactive distance meter with Arduino. The basic setup consistsofthe Arduino, ultrasonic sensor, and display, while optional components like LEDs, buzzers, and wireless modules allow you to enhance the system’s functionality. Whether you\'re building a simple distance measurement tool or a more complex system with feedback and remote monitoring, these components will help you create a versatile and efficient distance meter.
References
[1] UltrasonicMeasurement&technologies Sensor Physics and technique seriesJIKM NM [2] The Arduino projects by Sivakumar Munuswami [3] www.wikipedia.com [4] www.electronics4u.com [5] https://forums.oneplus.net/threads/top-5features-of- arduino-uno-r3-my-firstarticlehere.330321/ [6] https://www.arduino.cc/en/Main/ArduinoBoardUno [7] https://drive.google.com/drive/folders/13uYVcA3co6TsDl0vB5p07cZAcq5QBnIR [8] https://www.youtube.com/watch?v=tQjgn ZPJZsQ
Copyright
Copyright © 2025 Prof. Deepa Patki, Sahil Butala, Sujal Gorave, Ashish Gosavi, Prathamesh Pakale. This is an open access article distributed under the Creative Commons Attribution License, which permits unrestricted use, distribution, and reproduction in any medium, provided the original work is properly cited.

Download Paper
Paper Id : IJRASET67141
Publish Date : 2025-02-27
ISSN : 2321-9653
Publisher Name : IJRASET
DOI Link : Click Here
 Submit Paper Online