Ijraset Journal For Research in Applied Science and Engineering Technology
- Home / Ijraset
- On This Page
- Abstract
- Introduction
- Conclusion
- References
- Copyright
Object Scanner for 3D Reconstruction
Authors: Prof. Jitendra Gaikwad, Aditya Patil, Ritiksha Pardhi, Bhavesh Patil, Aaryen Patil
DOI Link: https://doi.org/10.22214/ijraset.2024.62806
Certificate: View Certificate
Abstract
In today\'s dynamic market landscape, the demand for precise 3D reconstruction methods is soaring across industries like architecture, entertainment, and manufacturing. Object scanning technologies offer a pivotal solution, providing detailed digital representations of real-world objects. With benefits ranging from accelerated product development cycles to enhanced cultural heritage preservation and the compact design of scanning systems, these advancements promise to revolutionize workflows, streamline processes, and drive innovation in an array of sectors, all while offering the added benefit of portability for on-the-go applications.
Introduction
I. INTRODUCTION
The process of 3D reconstruction plays a crucial role in various domains, including manufacturing, cultural heritage preservation, virtual reality, and augmented reality.
Within this realm, object scanning serves as a critical component, allowing for the capture of intricate details and spatial information essential for an accurate representation of the physical world. This paper addresses the evolving landscape of object scanning techniques and their pivotal role in the overarching goal of creating detailed 3D models.
In recent years, there has been a paradigm shift in the methodologies employed for object scanning, driven by advancements in sensor technologies, computer vision algorithms, and computational capabilities. Traditional approaches often faced challenges in capturing fine details, handling complex surfaces, and achieving real-time performance. The emergence of novel scanning technologies, such as structured light, laser, and depth sensing, has revolutionized the landscape, offering solutions to overcome these challenges and pushing the boundaries of what is achievable in 3D reconstruction.
This paper's main goal is to provide an extensive overview of the various object scanning techniques currently employed in 3D reconstruction applications. From contact-based methods to non-contact technologies, the survey encompasses a broad spectrum of approaches, highlighting their strengths, limitations, and real-world applications. The review also delves into the integration of machine learning and artificial intelligence in enhancing the accuracy and efficiency of object scanning processes, paving the way for autonomous and adaptive systems.
Delving into the intricacies of object scanning for 3D reconstruction, it becomes evident that the field is dynamic and continually evolving. Researchers and practitioners are confronted with the challenge of selecting the most suitable technique for specific applications, considering factors such as accuracy, speed, cost, and scalability. This paper aims to serve as a valuable resource for those navigating the diverse landscape of object scanning, providing insights into the latest developments and guiding future research directions in the pursuit of more refined and versatile 3D reconstruction methodologies.
II. LITERATURE SURVEY
- Authors of the paper DESIGN OF AN AUTOMATED 3D SCANNER have focused on exploration of 3D scanning, a pivotal facet of computer-aided design wherein existing physical entities are transformed into digital models. Various techniques exist for this purpose, ranging from LASER technology to cameras and advanced optical methods. In this paper, emphasis is placed on camera scanning, specifically delving into the realm of Photogrammetry—a technique harnessing imagery for 3D reconstruction, with a particular focus on small object scanning.[1]
- Authors have collectively acknowledged the intrinsic human inclination to build and recreate 3D objects, emphasizing its relevance in the landscape of Industry 4.0. The paper engages in a comprehensive exploration of 3D scanning, unraveling its working processes and highlighting its pivotal role in the context of reverse engineering and the evolving culture of Industry 4.0. The writers explore the key characteristics, functions, and uses of 3D scanning within this paradigm, emphasizing its ability to collect intricate information about an object's dimensions using various methods.[2]
- The paper discusses the investigation of 3D digitization techniques, focusing specifically on small parts and employing the optical 3D scanner GOM ATOS Triple Scan. The paper provides a concise overview of the general concept of Reverse Engineering, with a specific emphasis on 3D scanning. The authors underscore the integral role of optical 3D scanning, particularly utilizing the GOM ATOS Triple Scan, in the broader framework of Reverse Engineering. The focal point of the paper centers on the concrete 3D scanning methods on objects, including clips, ball nose end mills, screw drills, and coins. These objects exhibit unique shapes and sizes, allowing for a comprehensive examination of specific digitizing attributes. The paper meticulously navigates through the challenges encountered during the 3D digitization of each part, providing a step-by-step discussion of the issues and their resolutions.[3]
- In this study, a non-contact active system based on an IR distance sensor is proposed for acquiring object shapes using triangulation technology. Each approach has its advantages, disadvantages, and trade-offs. The system’s utilization of an IR sensor provides an alternative solution for 3D scanning, especially in scenarios where cost-effectiveness and simplicity are essential[4]
- This paper discusses the process of creating usable numerical models from three-dimensional image acquisition systems. The authors explore challenges related to range image registration, line-of-sight errors, mesh integration, surface properties extraction, and final model representation. They propose techniques for addressing these challenges, including variations of the Iterative Closest Point (ICP) method for alignment, averaging approaches for line-of-sight errors, and efficient rendering using graphics hardware. The paper contributes valuable insights to the field of computer graphics and 3D modeling.[5]
- In this study, the development of an open-source 3D triangular mesh processing and editing system called MeshLab is discussed. Managing unstructured big 3D models—which are frequently encountered in 3D scanning—is the authors' goal. A wide range of tools are available in MeshLab for activities like editing, repairing, examining, rendering, texturing, and converting meshes. It deals with holes, edges that are not manifold, and self-intersections. For simple 3D scanning tasks in industries like robotics and reverse engineering, MeshLab provides an affordable alternative to expensive scanners.[6]
- This study presents the accuracy of surface reconstruction using point clouds as examined by the authors. The authors use actual data to test and contrast several surface reconstruction techniques. Despite these developments, practical problems including missing surface points, misaligned point sets from multi-view scanning, and point outliers are still unresolved by current techniques. The study emphasizes the necessity for more investigation to increase 3D object reconstruction accuracy.[7]
III. METHODOLOGY/EXPERIMENTAL
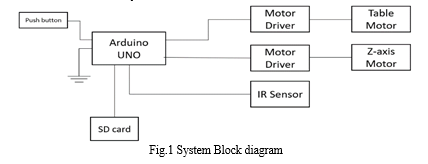
As shown in the fig 1, the various blocks in the system are

A. Object Scanning Setup:
The object scanning process initiates with the configuration of a controlled environment, ensuring optimal conditions for accurate data capture. The setup involves the placement of the target object within the scanning area (from 2- 15cm), with consideration given to lighting conditions and background control.
B. Data Acquisition
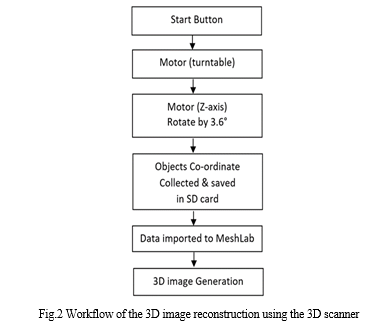
There is a SHARP IR sensor that continuously detects and measures the coordinates of the object which is continuously rotating with the help of a turntable motor. It provides every coordinate of the object layer by layer and helps in creating the mesh form of the object.
C. Calculations
The turntable motor is at a distance of 8 cm from the IR sensor. The z axis goes up by 1cm for every 8 rotations of the z axis motor. The Z axis motor will keep rotation till it reaches its maximum height. For every instance, 40 values of distance are noted and are averaged. This distance is the n mapped from 0 to 1024 and 0 to3.3 V
The final distance is calculated as
D= -5.40274 * Davg3 + 28.4823 * Davg2 - 49.7115(Davg) + 31.3444
(all these values were taken from the datasheet for the IR sensor)
The average is then used to find out the final values of x and y using the angle of the motor using
x = sin(angle) x D, and
y = cos(angle) * D
D. Point Cloud Generation
A point cloud, which represents a collection of data points in a three-dimensional coordinate system, is created by processing the acquired data. The cornerstone for the ensuing model rebuilding is this fundamental phase.
E. Mesh Generation and Texturing
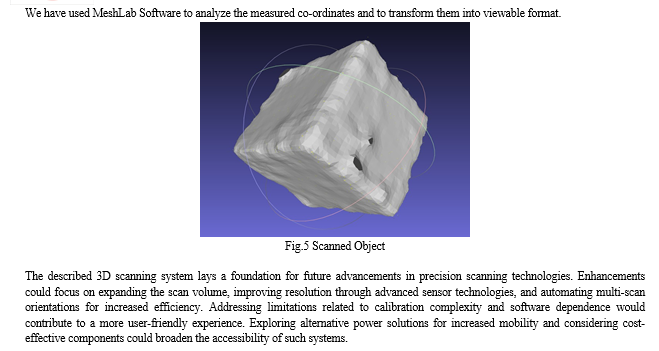
The point cloud is utilized to create a mesh, defining the object's surface geometry. Texture information is applied to enhance visual realism, resulting in a complete 3D model.
F. Post-Processing and Refinement
The final step involves post-processing techniques to refine the 3D model, addressing noise, outliers, and any artifacts introduced during the scanning process. Iterative refinement ensures a high-fidelity representation of the scanned object.
G. Working of the system
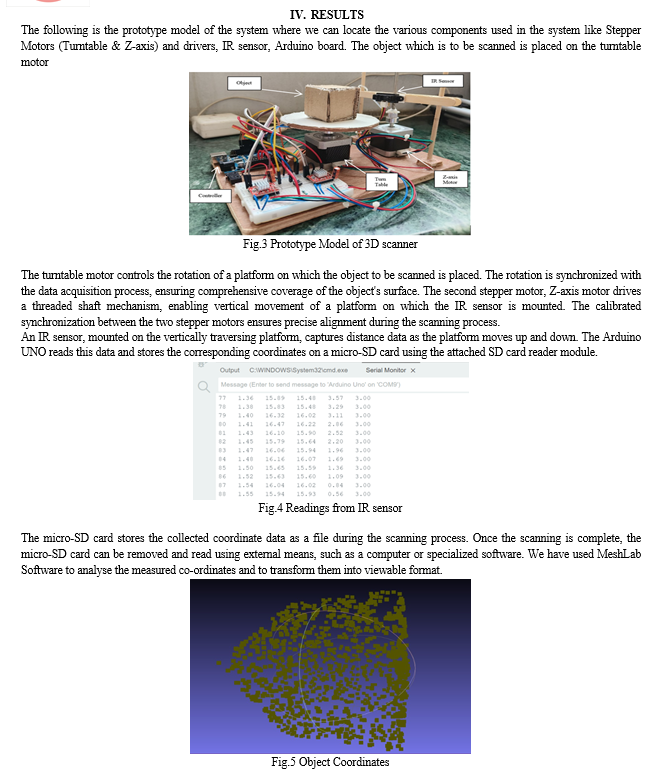
The proposed 3D scanning system integrates two stepper motors, an Arduino UNO microcontroller, an IR sensor, and a micro-SD card reader module to facilitate the digitization of physical objects. The coordinated movement of a rotating platform and a vertically traversing platform, both driven by calibrated stepper motors, enables precise scanning. The system operates in conjunction with a toggle switch for seamless platform movement and is powered by an external power supply.


Conclusion
In conclusion, the presented 3D scanning system provides a valuable tool for capturing detailed digital models of physical objects. While acknowledging limitations such as scan volume constraints and surface considerations, the system\'s automated approach, synchronized stepper motors, and versatile applications underscore its significance. Future developments hold the potential to refine precision, expand capabilities, and address current constraints, positioning this technology as a promising asset for industries ranging from manufacturing to digital preservation.
References
[1] Alaa Abd-Raheem; Farah AlDeiri; Musa Alyaman “Design of an Automated 3D Scanner.”, Published in: 2018 International Arab Conference on Information Technology (ACIT), DOI: 10.1109/ACIT.2018.8672679,Date Added to IEEE Xplore: 25 March 2019J. Clerk Maxwell, A Treatise on Electricity and Magnetism, 3rd ed., vol. 2. Oxford: Clarendon, 1892, pp.68–73. [2] Abid Haleem a, Mohd Javaid a, Ravi Pratap Singh b, Shanay Rab a, Rajiv Suman c, Lalit Kumar d, Ibrahim Haleem Khan “Exploring the potential of 3D scanning in Industry 4.0: An overview”, Published in : International Journal of Cognitive Computing in Engineering [3] Ladislav MOROVI?1, Peter POKORNÝ2,b “Optical 3D Scanning of Small Parts ”, DOI: https://doi.org/10.4028/www.scientific.net/AMR.468-471.2269 [4] Joao Braun, Jose Lima, Ana I. Pereira, Claudia Rocha, Paulo Costa “Three-dimensional scanning system based on a low-cost infrared sensor”, IEEE 26th International Conference on Emerging Technologies and Factory Automation, 2021 [5] F. Bernardini and H. Rushmeier, “The 3d model acquisition pipeline,” in Computer graphics forum, vol. 21, pp. 149–172, Wiley Online Library, 2002. [6] P. Cignoni, M. Callieri, M. Corsini, M. Dellepiane, F. Ganovelli, and G. Ranzuglia, “MeshLab: an Open-Source Mesh Processing Tool,” in Eurographics Italian Chapter Conference (V. Scarano, R. D. Chiara, and U. Erra, eds.), The Eurographics Association, 2008. [7] A.Ruchay, K. Dorofeev, V. Kalschikov, and A. Kober, “Accuracy analysis of surface reconstruction from point clouds,” in 2020 International Conference on Information Technology and Nanotechnology (ITNT), pp. 1–4, 2020. [8] A. L. Reyes, J. M. Cervantes, and N. C. Gutierrez, “Low cost 3d scanner ´ by means of a 1d optical distance sensor,” Procedia Technology, vol. 7, pp. 223–230, 2013. [9] J. Straub, B. Kading, A. Mohammad, and S. Kerlin, “Characterization of a large, low-cost 3d scanner,” Technologies, vol. 3, no. 1, pp. 19–36, 2015. [10] J. Guo, Q. Wang, and J.-H. Park, “Geometric quality inspection of prefabricated MEP modules with 3d laser scanning,” Automation in Construction, vol. 111, p. 103053, 2020. [11] J. Brablik, R. Martinek, M. Haluska, and P. Bil´?k, “A 3d scanner based on virtual instrumentation implemented by a 1d laser triangulation method,” in International Conference on Advanced Engineering Theory and Applications, pp. 982–990, Springer, 2018. [12] Siti Asmah Daud, Nasuha Mohd Shaber, Nasrul Humaimi Mahmood & Muhammad Hanif Ramlee “Polygon 3D Surface Reconstruction Using IR Scanner”, Communications in Computer and Information Science book series (CCIS,volume 751), 2017.
Copyright
Copyright © 2024 Prof. Jitendra Gaikwad, Aditya Patil, Ritiksha Pardhi, Bhavesh Patil, Aaryen Patil. This is an open access article distributed under the Creative Commons Attribution License, which permits unrestricted use, distribution, and reproduction in any medium, provided the original work is properly cited.

Download Paper
Paper Id : IJRASET62806
Publish Date : 2024-05-27
ISSN : 2321-9653
Publisher Name : IJRASET
DOI Link : Click Here
 Submit Paper Online

